Overview
I will be using the K3S Single-server Setup with an Embedded DB. You can find it on the k3s site here. 
It is a very simple setup. I will have one Server node and only two Agent nodes. I will also configure a Traefik ingress controller to expose my services to the internet. Traefik comes with K3S so I decided to use this but Nginx is a popular alternative.
Installing K3S
Installing K3S is a very straightforward process. The documentation on it is very good.
All you need to do is run this script on your server node (I am disabling servicelb and traefik because I will be setting up traefik later with helm for easier configuration and using metallb as a load balancer.)
1
curl -sfL https://get.k3s.io | K3S_KUBECONFIG_MODE="644" INSTALL_K3S_EXEC="--disable=traefik" INSTALL_K3S_EXEC="--disable=servicelb" sh -
Then run this script on each of your agent nodes:
1
curl -sfL https://get.k3s.io | K3S_URL=https://myserver:6443 K3S_TOKEN=mynodetoken sh -
The K3S_TOKEN can be found on the server node at /var/lib/rancher/k3s/server/node-token
Run a quick kubectl get nodes on your server node to make sure your agents are connected and this is it.
Traefik Disabling bug as of k3s 1.27.3
For some reason passing the INSTALL_K3S_EXEC="--disable=traefik doesn’t actually keep traefik from deploying even thought docs say it does. To check if traefik is running on your cluster use this command kubectl -n kube-system get pods. If you see traefik pods follow these steps to manually remove traefik:
Remove Traefik helm chart by executing this kubectl command:
1
kubectl -n kube-system delete helmcharts.helm.cattle.io traefik
Stop k3s:
1
sudo service k3s stop
Edit the k3s service file /etc/systemd/system/k3s.service by adding this line to the ExecStart '–-disable=traefik' \
The k3s service file should look like: /etc/systemd/system/k3s.service
1
2
3
4
5
6
7
8
9
10
11
12
13
14
15
16
17
18
19
20
21
22
23
24
25
26
27
28
29
30
31
32
[Unit]
Description=Lightweight Kubernetes
Documentation=https://k3s.io
Wants=network-online.target
After=network-online.target

[Install]
WantedBy=multi-user.target

[Service]
Type=notify
EnvironmentFile=-/etc/default/%N
EnvironmentFile=-/etc/sysconfig/%N
EnvironmentFile=-/etc/systemd/system/k3s.service.env
KillMode=process
Delegate=yes
# Having non-zero Limit*s causes performance problems due to accounting overhead
# in the kernel. We recommend using cgroups to do container-local accounting.
LimitNOFILE=1048576
LimitNPROC=infinity
LimitCORE=infinity
TasksMax=infinity
TimeoutStartSec=0
Restart=always
RestartSec=5s
ExecStartPre=/bin/sh -xc '! /usr/bin/systemctl is-enabled --quiet nm-cloud-setup.service'
ExecStartPre=-/sbin/modprobe br_netfilter
ExecStartPre=-/sbin/modprobe overlay
ExecStart=/usr/local/bin/k3s \
    server \
        '--disable=servicelb' \
        '--disable=traefik' \
After that reload the service and remove the auto-deploy traefik manifest:
1
2
sudo systemctl daemon-reload
sudo rm /var/lib/rancher/k3s/server/manifests/traefik.yaml
Then restart the k3s service:
1
sudo service k3s start
Installing Helm package manager
Helm is a package manager for Kubernetes that makes installing new tools very easy. Here are the docs. You just need to run these commands:
1
2
3
$ curl -fsSL -o get_helm.sh https://raw.githubusercontent.com/helm/helm/main/scripts/get-helm-3
$ chmod 700 get_helm.sh
$ ./get_helm.sh
Now just run helm version to make sure it installed correctly.
Lastly since we are using upstream tools we will need to export teh kube config variable so that helm has access to the cluster:
1
export KUBECONFIG=/etc/rancher/k3s/k3s.yaml
Installing MetalLB
https://metallb.universe.tf/installation/
Just run this manifest:
1
kubectl apply -f https://raw.githubusercontent.com/metallb/metallb/v0.13.10/config/manifests/metallb-native.yaml
Create a config.yaml to customize your metalLb deployment such as this: config/yaml
1
2
3
4
5
6
7
8
apiVersion: metallb.io/v1beta1
kind: IPAddressPool
metadata:
  namespace: metallb-system
  name: ip-address-pool
spec:
  addresses:
  - 192.168.50.240-192.168.50.249
Then kubectl apply -f config.yaml to apply the newly created config. Run kubectl get namespaces to see the newly created metallb-system namespace
Setting up Traefik Ingress Controller
First add the traefik help repo
1
helm repo add traefik https://traefik.github.io/charts
Update the repo
1
helm repo update
Create the traefik namespace
1
kubectl create namespace traefik
Check to see if namespace was successfully created
1
kubectl get namespaces
Create values.yaml for traefik values.yaml
1
2
3
4
5
6
7
8
9
10
11
12
13
14
15
16
17
18
19
20
21
22
23
24
25
26
27
28
29
30
31
32
33
34
35
36
37
38
39
40
41
42
43
44
45
46
47
48
49
50
globalArguments:
  - "--global.sendanonymoususage=false"
  - "--global.checknewversion=false"

additionalArguments:
  - "--serversTransport.insecureSkipVerify=true"
  - "--log.level=INFO"

deployment:
  enabled: true
  replicas: 1
  annotations: {}
  podAnnotations: {}
  additionalContainers: []
  initContainers: []

ports:
  web:
    redirectTo: websecure
  websecure:
    tls:
      enabled: true

ingressRoute:
  dashboard:
    enabled: false

providers:
  kubernetesCRD:
    enabled: true
    ingressClass: traefik-external
    allowExternalNameServices: true
  kubernetesIngress:
    enabled: true
    allowExternalNameServices: true
    publishedService:
      enabled: false

rbac:
  enabled: true

service:
  enabled: true
  type: LoadBalancer
  annotations: {}
  labels: {}
  spec:
    loadBalancerIP: 192.168.50.241 # IP in the MetalLB range from metallb config.yaml
  loadBalancerSourceRanges: []
  externalIPs: []
Install traefik
1
helm install --namespace=traefik traefik traefik/traefik --values=values.yaml
check to make sure that an external IP provided by MetalLB was applied to traefik
1
kubectl get svc --all-namespaces -o wide
You should see something similar to this:
1
traefik          traefik           LoadBalancer   10.43.144.134   192.168.50.241   80:31343/TCP,443:30750/TCP   52m   app.kubernetes.io/instance=traefik-traefik,app.kubernetes.io/name=traefik
Traefik Middle ware
Create a new file call default-headers.yaml default-headers.yaml
1
2
3
4
5
6
7
8
9
10
11
12
13
14
15
16
apiVersion: traefik.containo.us/v1alpha1
kind: Middleware
metadata:
  name: default-headers
  namespace: default
spec:
  headers:
    browserXssFilter: true
    contentTypeNosniff: true
    forceSTSHeader: true
    stsIncludeSubdomains: true
    stsPreload: true
    stsSeconds: 15552000
    customFrameOptionsValue: SAMEORIGIN
    customRequestHeaders:
      X-Forwarded-Proto: https
run kubectl apply -f default-headers.yaml then ‘kubectl get middleware’ to see it installed.
Traefik Dashboard
We need to create a basic authentication credential using htpasswd. This comes from apache utilities.
1
sudo apt install apache2-utils
Then create a basic username and password
1
htpasswd -nb pope {password} | openssl base64
Take note of the secret that is displayed. Now we are going to create a Kubernetes secret.
secret-dashboard.yaml
1
2
3
4
5
6
7
8
9
---
apiVersion: v1
kind: Secret
metadata:
  name: traefik-dashboard-auth
  namespace: traefik
type: Opaque
data:
  users: abc123==
Then run
1
kubectl apply -f secret-dashboard.yaml
Check to make sure secret was created with kubectl get secrets -n traefik
Login at load-balancer-ip to see the dashboard.
Configuring ArgoCD
Install ArgoCD
1
2
kubectl create namespace argocd
kubectl apply -n argocd -f https://raw.githubusercontent.com/argoproj/argo-cd/stable/manifests/core-install.yaml
Make argoCD available in our load balancer IP Pool
1
kubectl patch svc argocd-server -n argocd -p '{"spec": {"type": "LoadBalancer"}}'
Install ArgoCD CLI
1
2
3
curl -sSL -o argocd-linux-amd64 https://github.com/argoproj/argo-cd/releases/latest/download/argocd-linux-amd64
sudo install -m 555 argocd-linux-amd64 /usr/local/bin/argocd
rm argocd-linux-amd64
Export Config again
1
export KUBECONFIG=/etc/rancher/k3s/k3s.yaml
Retrieve initial password. Default username i admin
1
 argocd admin initial-password -n argocd
I recommend changing the password in user info when you log into the UI.
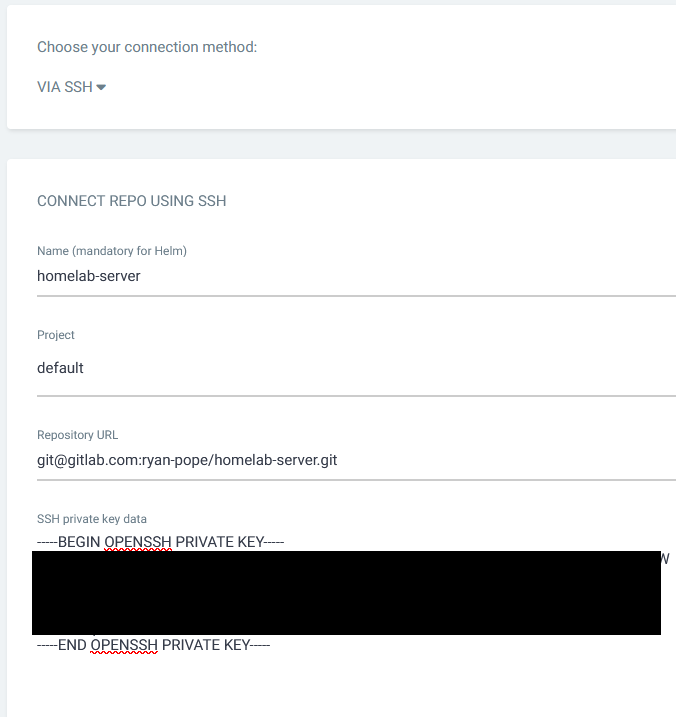
Connecting ArgoCD to Git repo
In the UI go to Setting > Repositories > + Connect Repo
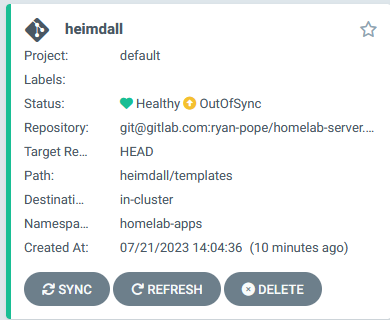
To deploy your first application you want to create deployment.yaml, ingress.yaml and service.yaml I will be showing my heimdall set up but this can be applied to whatever you want to deploy.
deployment.yaml
1
2
3
4
5
6
7
8
9
10
11
12
13
14
15
16
17
18
19
20
21
22
23
24
25
26
27
28
29
30
31
32
apiVersion: apps/v1
kind: Deployment
metadata:
  name: heimdall-deployment
spec:
  selector:
    matchLabels:
      app: heimdall
  replicas: 1
  template:
    metadata:
      labels:
        app: heimdall
    spec:
      containers:
      - name: heimdall
        image: linuxserver/heimdall
        volumeMounts:
        - name: config-volume
          mountPath: /config
      volumes:
      - name: config-volume
        hostPath:
          path: /home/user/appdata/heimdall
      env:
      - name: PUID
        value: "1000"
      - name: PGID
        value: "1000"
      - name: TZ
        value: "America/Denver"
      restartPolicy: Always
ingress.yaml
1
2
3
4
5
6
7
8
9
10
11
12
13
14
15
16
17
18
19
20
21
22
23
apiVersion: traefik.containo.us/v1alpha1
kind: IngressRoute
metadata:
  name: heimdall
  namespace: homelab-apps
  annotations:
    kubernetes.io/ingress.class: traefik-external
spec:
  entryPoints:
    - websecure
  routes:
    - match: Host(`192.168.50.142`) #IP in the MetalLB range from metallb config.yaml
      kind: Rule
      services:
        - name: hemidall
          port: 80
    - match: Host(`192.168.50.142`) #IP in the MetalLB range from metallb config.yaml
      kind: Rule
      services:
        - name: nginx
          port: 80
      middlewares:
        - name: default-headers
service.yaml
1
2
3
4
5
6
7
8
9
10
11
12
apiVersion: v1
kind: Service
metadata:
  name: heimdall-service
spec:
  selector:
    app: heimdall
  ports:
  - port: 80
    protocol: TCP
    targetPort: 80
  type: LoadBalancer
To deploy this using Argo, go to Applications then Create Application in the UI. Here is my heimdall application synced up.