
Introduction
I finally decided that I should pull the trigger and build a homelab. I decided to buy a PC to use as my server for energy cost and space saving reasons. I got my hands on a refurbished HP EliteDesk 800 G3 Small Form Factor PC with 32 GB RAM installed with the ability to upgrade to 64, which should be enough for my entry level lab.
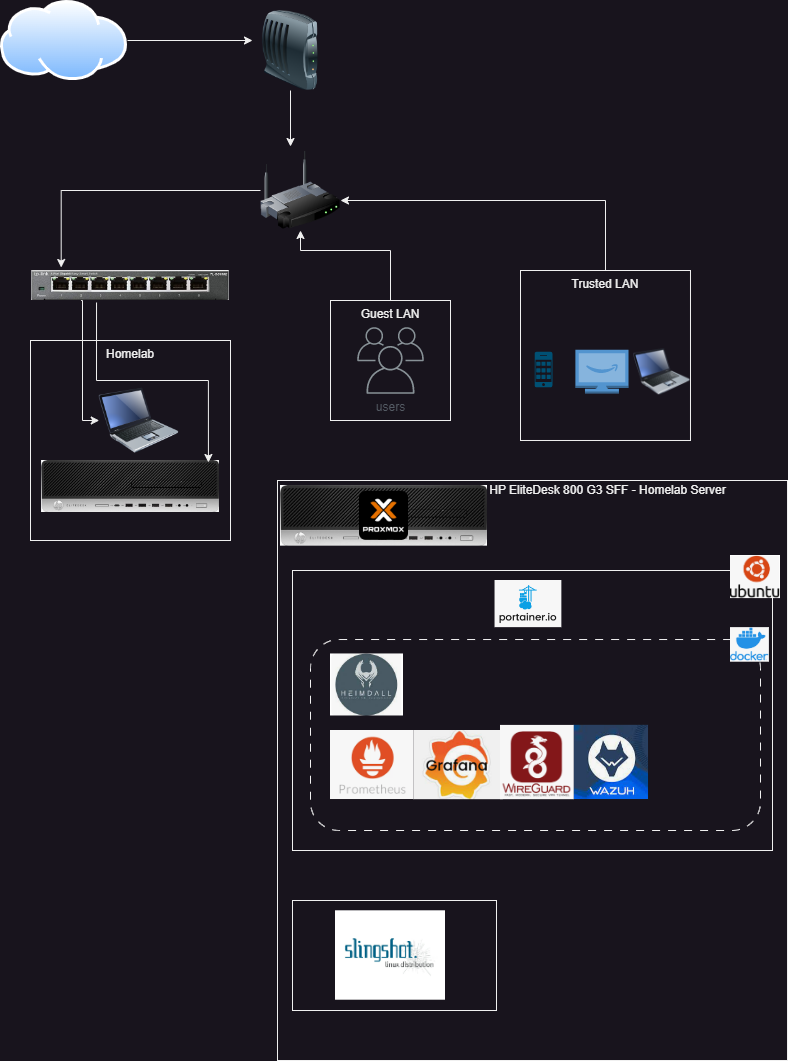
Network Map
I plan to slowly add to my network to make it more secure and to learn how to configure more devices. My setup is limited by the physical location of my cable modem and I can’t run cable through my floors right now. Still configuring my server at the moment.
Proxmox
Setting up Proxmox was an easy process. You just need to make a bootable USB drive, change the boot order on your server and fire it up. There are plenty of tutorials but I used Techno Tim’s. Proxmox VE Install and Setup Tutorial.
Ubuntu VM
Once I had Proxmox set up on my server, I created my first VM and converted it to a template. Well, I actually created a few Ubuntu VMs before this but never converted to a template and when things went wrong I had to completely restart so I learned my lesson. Again I followed a guide from Techno Tim Virtualize Ubuntu Server with Proxmox VE.
After getting my VM setup following his guide, I also made sure to install docker and place my gitlab SSH key on it (not a secure practice but since it is just in my home environment I decided to do it anyway) so that when I convert this to a template and clone it the tools I need will already be on it. To convert to a template you just need to right click on your VM name and select ‘convert to template’.
Then to create a VM from the template, right click on your template and select ‘Clone’. Now you have a VM that can be destroyed and spun up again as needed
Setting up Portainer
I decided to use portainer to manage my docker deployments because I found myself trying to learn too much at once when I first tried using Rancher. Maybe in the future I will switch to Rancher and automate this process more but the point of my lab right now is to learn how to configure and use new cyber related tools and not be devops. Portainer is a very easy beginner tool and give you a nice GUI for your docker deployments. Here is a sample docker-compose to set up a Portainer container.
docker-compose.yml
1
2
3
4
5
6
7
8
9
10
11
12
13
version: "3"
services:
  portainer:
    image: portainer/portainer-ce:latest
    container_name: portainer
    ports:
      - 9443:9443
    volumes:
      - data:/data
      - /var/run/docker.sock:/var/run/docker.sock
    restart: unless-stopped
volumes:
  data:
Now you should be able to access your Portainer container on https://{Ubuntu-VM-IP}:9443
Creating Stacks on Portainer
Creating stacks on Portainer is very easy and helps you to sort your Docker deployments better. You can upload configuration files from your local environment, create a docker compose file in the web IDE, link to a Github/gitlab repository or use a template.
Wireguard
I first set up a Wireguard stack so that I could connect to my home network from anywhere. I decided to link my Gitlab repo to create my stacks and containers. Setting up your Gitlab repo is very intuitive but if it is private you will need to generate a personal access token from Gitlab so that Portainer can authenticate to it.
docker-compose.yml
1
2
3
4
5
6
7
8
9
10
11
12
13
14
15
16
17
18
19
20
21
22
23
24
25
26
27
28
version: "2.1"
services:
  wireguard:
    image: lscr.io/linuxserver/wireguard:latest
    container_name: wireguard
    cap_add:
      - NET_ADMIN
      - SYS_MODULE
    environment:
      - PUID=1000
      - PGID=1000
      - TZ=USA/Denver
      - SERVERURL=auto #optional
      - SERVERPORT=51820 #optional
      - PEERS=4 #optional
      - PEERDNS=auto #optional
      - INTERNAL_SUBNET=10.13.13.0 #optional
      - ALLOWEDIPS=0.0.0.0/0 #optional
      - PERSISTENTKEEPALIVE_PEERS= #optional
      - LOG_CONFS=true #optional
    volumes:
      - path/to/config/data:/config
      - /lib/modules:/lib/modules
    ports:
      - 51820:51820/udp
    sysctls:
      - net.ipv4.conf.all.src_valid_mark=1
    restart: unless-stopped
Very important step before you run this docker compose file. On your Ubuntu VM run the command sudo chown $USER:$USER path/to/config. This gives your user ownership of the folder that contains the config for all the client peers. If you set up Docker correctly using the post installation steps this will also give Docker the ability to read these contents. I did not do this and I could never connect to the internet until I came across this video: Create your own VPN server with WireGuard in Docker
You will also want to make sure that your router is set up to port forward your Ubuntu VM IP on port 51820/UDP.
Prometheus and Grafana
Next I set up Prometheus and Grafana to monitor my docker logs. I used this guide to help me out: How to monitor Docker metrics using Prometheus & Grafana?
You will first need to create a daemon.json file and place it at /etc/docker/daemon.json
daemon.json
1
2
3
4
{
    "metrics-addr" : "0.0.0.0:9323",
    "experimental" : true
  }
Next, create a prometheus.yml file. This file will need to be referenced in you final docker compose file.
prometheus.yml
1
2
3
4
5
6
7
8
9
10
11
12
13
14
15
16
17
18
global:
  scrape_interval:     15s
  evaluation_interval: 15s


rule_files:
  # - "first.rules"
  # - "second.rules"


scrape_configs:
  - job_name: prometheus
    static_configs:
      - targets: ['localhost:9090']
  - job_name: app
    scrape_interval: 5s
    static_configs:
      - targets: ['192.168.50.210:9323']
After these are created you can run this docker compose file being sure to place the path to your prometheus.yml file in here.
docker-compose.yml
1
2
3
4
5
6
7
8
9
10
11
12
13
14
15
16
17
18
19
20
21
22
23
24
25
26
27
28
29
30
31
32
version: '3'


volumes:
  grafana-data:
    driver: local
  prometheus-data:
    driver: local


services:
  grafana:
    image: grafana/grafana-oss:latest
    container_name: grafana
    ports:
      - "3000:3000"
    volumes:
      - grafana-data:/var/lib/grafana
    restart: unless-stopped


  prometheus:
    image: prom/prometheus:latest
    container_name: prometheus
    ports:
      - "9090:9090"
    volumes:
      - /etc/prometheus:/etc/prometheus
      - prometheus-data:/prometheus
    restart: unless-stopped
    command:
      - "--config.file=/path/to/prometheus.yml"
You can now access Grafana at http://{Ubuntu-VM-IP}:3000 and Prometheus at http://{Ubuntu-VM-IP}:9090.
Now you can add your first data source from the homepage and select ‘Prometheus’ as the source. For ‘URL’ put {http://Ubuntu-VM-IP}:9090. Set your Prometheus version and leave the rest as is.
Now we can create our first dashboard to monitor our docker containers.
Wazuh
Still configuring this to correctly ingest my data.
You can access the Wazuh dashboard at https://{Ubuntu-VM-IP}:5601.
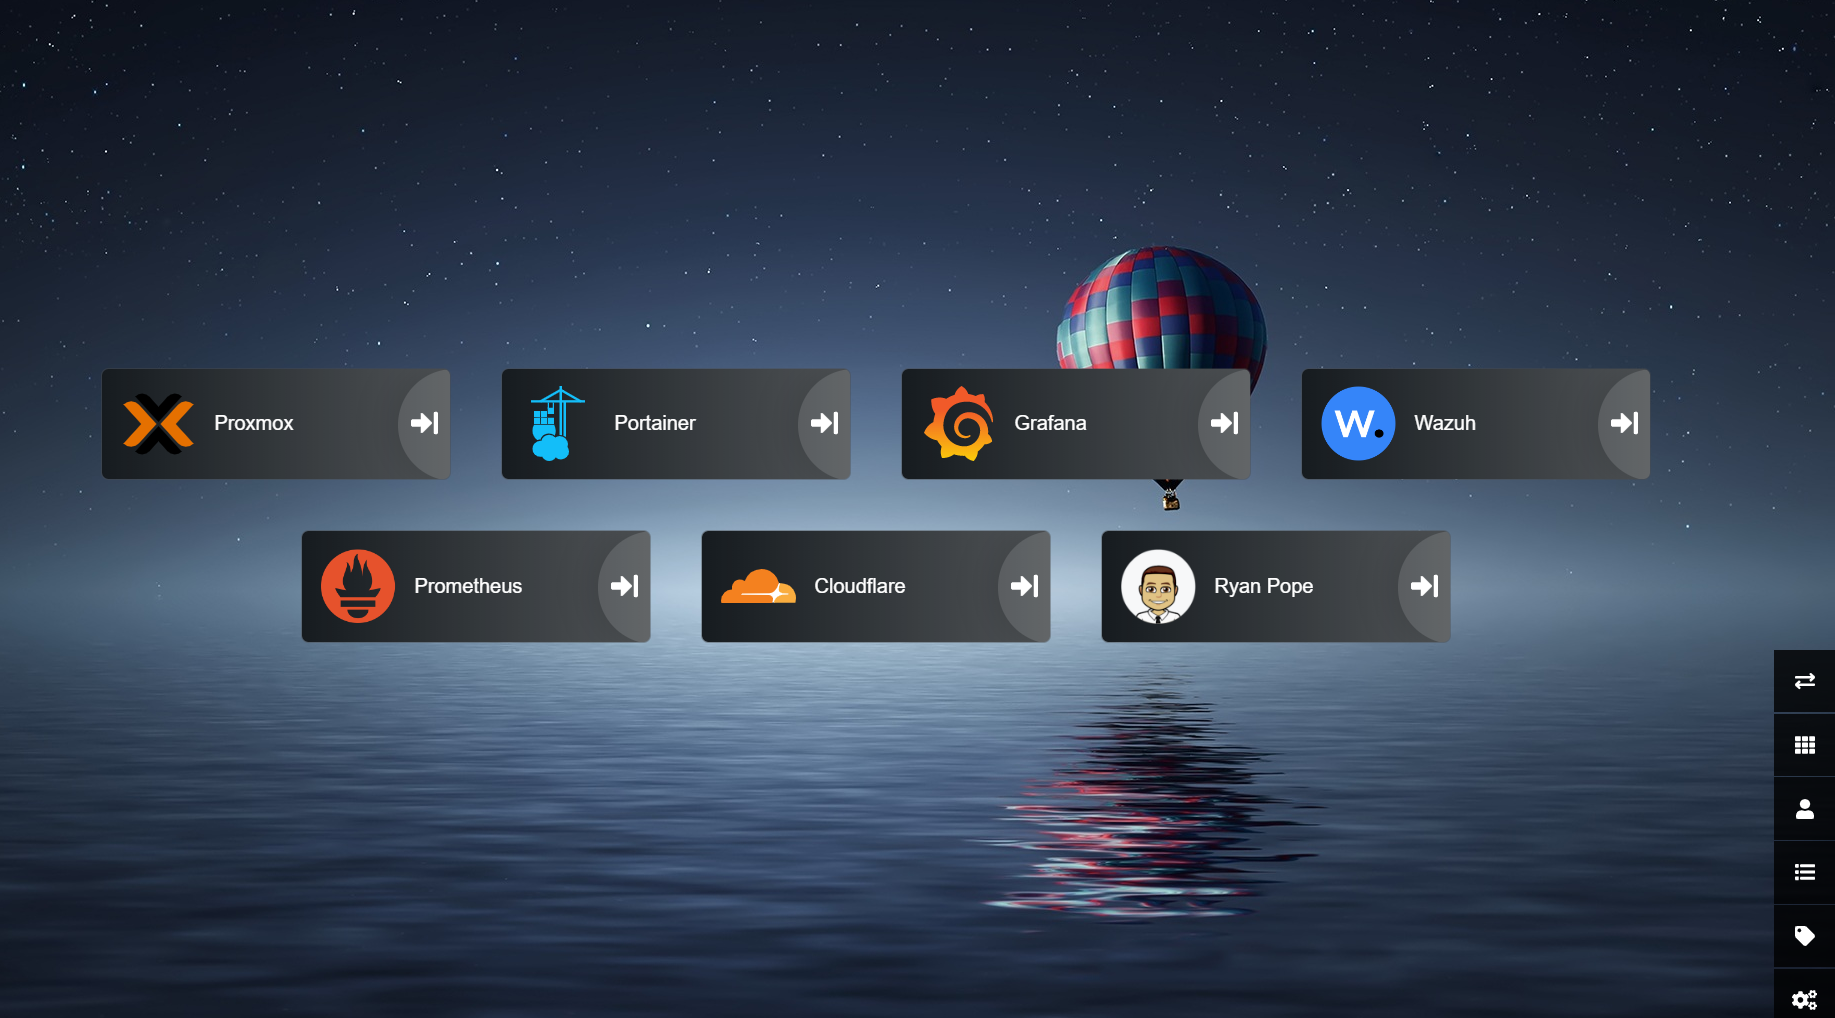
Heimdall
Heimdall is a great way to organize all the links in your server and web applications in a simple way. It is very easy to set up with docker-compose. I followed Techno Tim’s video for this as well Meet Heimdall, Your Homelab Application Dashboard.
Another good tip is to go into settings and Export your Heimdall setup if you are going to shutdown this VM. As long as you are creating from the same proxmox template your IP should stay the same so your links should work just fine.
Cloudflare Tunnel
I also set up cloudflare tunnels to access my applications without needing to VPN into my network. You will need to set up a CLoudflare account and have a registered domain name with them. This website is hosted by cloudflare so I used this domain for my tunnels.
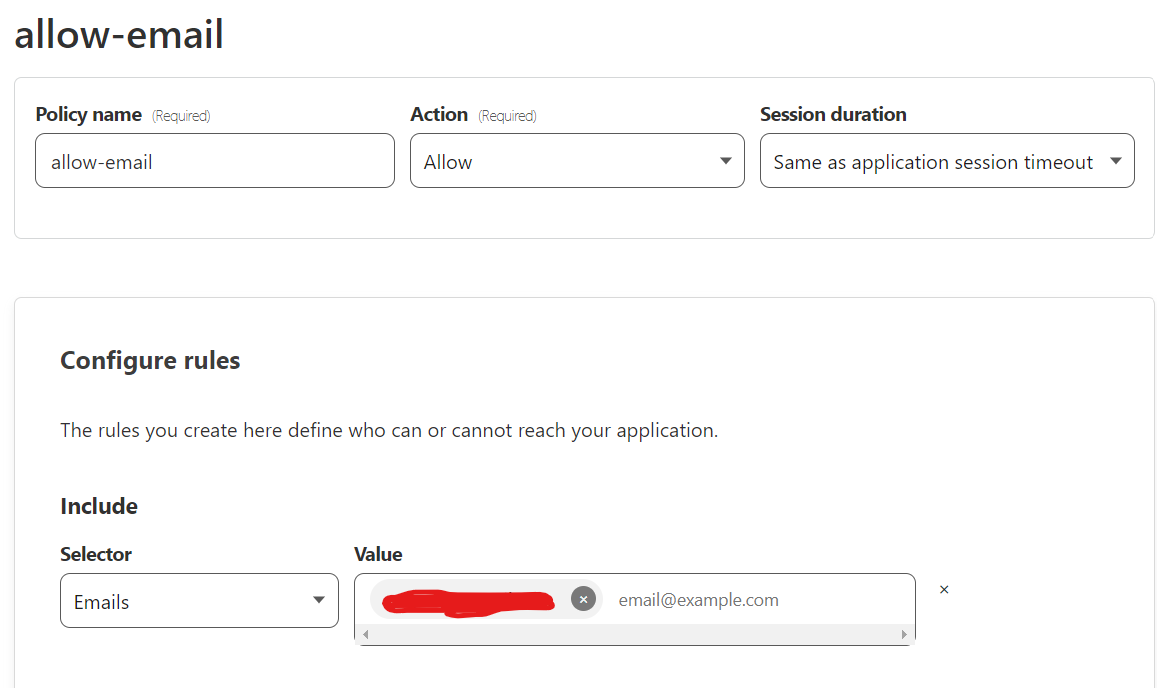
Before you set up any tunnels or publish any services you want to create an application that the services live behind. Go to the Zero Trust Dashboard and give your team any name. Go to Access > Applications on the side bar. Click ‘+ Add an application’. Pick self-hosted and enter an application name, whatever session duration you want and use the domain you have registered with Cloudflare. At the bottom under ‘Identity Providers’ I suggest leaving this enabled to accept all. It will use all authentication that you have set up in ‘Settings >Authentication > Login Methods. Click next to create your policies. I created two policies, one that blocks everyone except for the specific IPs that I will be logging in from. The second policy only grants access if you use the correct email and then you need to have access to that email to receive a One Time Pin. Note: I have one time pin set up under my setting which is why it defaults to this method. There are plenty of other authentication methods but this one is secure enough for my needs.

To create your first tunnel go to Tunnels in the Access dropdown on the left side. 
Then press ‘+ Create a Tunnel”. Give your tunnel a name and save it. It will then ask you what OS you are running to install and run a connector on. Choose docker for this if you want to run in a container. You can run the command it gives you which is something like docker run cloudflare/cloudflared:latest tunnel --no-autoupdate run --token $TUNNEL_TOKEN. I chose to create a docker compose file with a .env file to store my tunnel token in.
.env
1
TUNNEL_TOKEN={your Cloudflare generated token from the command}
Place this in the same directory as your docker compose file or if you are using Portainer to create this container you can use its built in environment variable function.
docker-compose.yml
1
2
3
4
5
6
7
8
9
version: '3.9'
services:
  cloudflaretunnel:
    conatiner_name: cloudflaretunnel-01
    image: cloudflare/cloudflared:latest
    restart: unless-stopped
    environment:
      - TUNNEL_TOKEN=${TUNNEL_TOKEN}
    command: tunnel --no-autoupdate run
Once this container is up and running you should see your tunnel change to healthy in the Cloudflare dashboard. To expose your services go to the ‘Public Hostname’ tab. Then press ‘+ Add a public hostname’. For the subdomain I put the name of my container or whatever application that I am accessing. For domain use the domain you registered with Cloudflare and the same one you used for your application. For service, put the URL of your service. It will most likely be something like http(s)://{UBUNTU VM IP}:PORT. If you do have a https URL then you will want to go to ‘Additional Application Settings’ > ‘TLS’ and enable ‘No TLS Verify. You can set up certificates but that is not something I am doing at this time. Then press ‘Save hostname’. You can add as many services you want.